
Finger Bend
Step By Step Tutorial
Open Source Documentation
The Finger Bend tutorial is designed for laptops / desktops / horizontal tablets. Could be tricky to follow on a tiny mobile screen.
I am controlling the brightness of the LED by bending my finger. The more I bend it, the stronger the light.
Finger Bend is a sensor created to find a way of making finger bends inside of a glove, control light and sound.
The idea behind this glove is to then connect it to a body suit with other eTextile sensors for Immersive Audiovisual Performances.
What inspired me to create this project was the vision of performing freely through body movements. It is our innate interface. From my view, it is the obvious tool, instead of a trackpad, mouse, tablet, controllers, joysticks…
Inspiration: KOBAKANT’s sheath bend sensor.
Finger Bend was created for the E-Textile Summercamp’s Electronic Textile Swatch Exchange
The E-Textile Summercamp‘s Swatchbook Exchange is a platform for sharing physical work samples in the field of electronic textiles. The exchange wishes to emphasize the importance of physicality and quality workmanship in an increasingly digital world.
Finger Bend is made for the finger to insert, in order to capture its bending data.
Let’s make it!


Materials:
× Stretch Piezoresistive Fabric
× Stretchy Jersey Fabric (base fabric / non-conductive)
× 2nd Non-Conductive Fabric (top fabric)
× Copper or Other Low Resistance Conductive Thread
× Non-Conductive Thread
× 2 Male Pins

Tools:
× Sewing machine
× LED
× Breadboard
× Computer with arduino and the library for the microcontroller* you are using if it is not yet installed
× USB cable
× Lighter or heat gun (for shrink tube)
A Microcontroller: Arduino Uno/Nano | Teensy | ESP32
How the Finger Bend sensor is made:
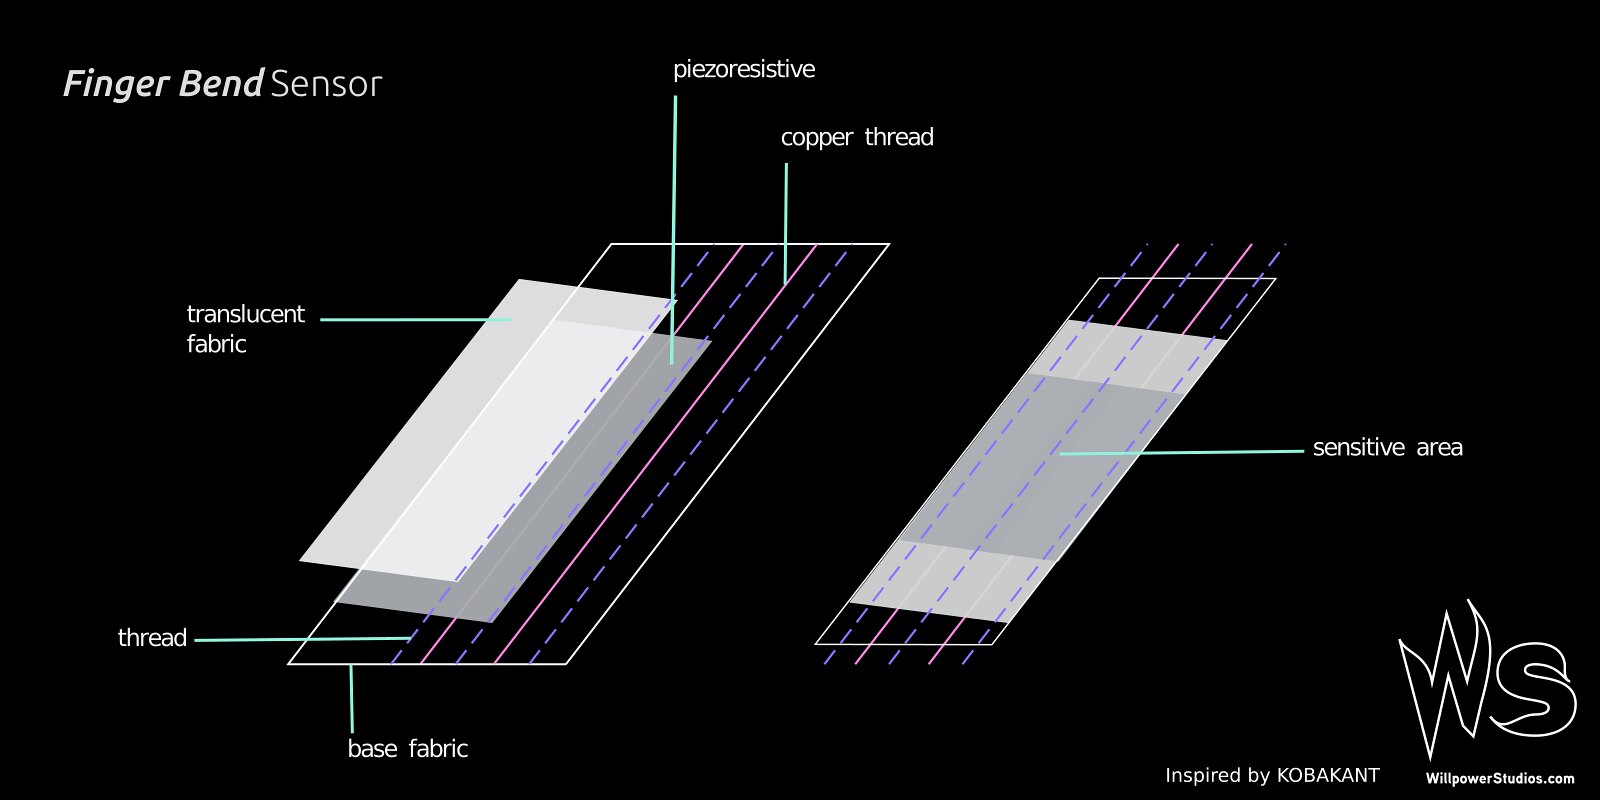
sheath bend finger sensor illustration
The illustration above is inspired by plusea’s drawing.

•
Steps
Cut the stretch jersey fabric to the length of your finger from the knuckle to the beginning of your nail and width of ~ 8 cm. Cut a piece of stretchy piezoresistive material and top fabric, both at the same size, similar to the photos below. Place piezoresistive stretchy fabric in between non-conductive fabrics.
•

Place piezoresistive fabric in between the base and top fabrics
•
•

•

turn it inside out
•


•

Tie knot at the entrance of one of the 2 pathways (in between the threaded lines). Slide the copper or conductive thread through the eye of the needle.
•

circle pin with copper thread
•

Do the same with the next thread

Align them on top of one another
•

•


Cut extremeties for closing
•

slide a finger through it to feel the size
•

•

Pass needle through pathway (with a tight knot at the entrance before going through hole)
•

slide pin through shrink tube
•


Sew 3 lines to slide the 2 copper threads in between them
•
•


sew the ‘inside’ to close
•

do a few bends to make sure it fits
•

•

Once you are at this stage, grab a male pin. We will tie the thread around it to make it a naked wire.
•

use head gun or lighter to shrink it on pin and copper thread.
•

•
1. How to Test It:
Connect each copper thread pin to an alligator clip.
Clip their opposite side to multimeter nodes, using the ohm measurement.
Observe the change in ohms as your finger bends.
Make sure the copper threads do not touch 😉
2. Programming Microcontroller:
Setup + Wiring:

•

•
arduino code:
// start
// WILLPOWER @ Swatch Exchange 2021
#define LED_BUILTIN 13
#define LED 4
int bendSensorValue;
int light;
// the setup function runs once when you press reset or power the board
void setup() {
Serial.begin(9600);
// initialize digital pin LED_BUILTIN as an output.
pinMode(LED_BUILTIN, OUTPUT);
pinMode(LED, OUTPUT);
pinMode(A0, INPUT_PULLUP);
}
// the loop function runs over and over again forever
void loop() {
bendSensorValue = analogRead(A0);
light = map(bendSensorValue, 740, 840, 255, 0);
light = constrain(light, 0, 255);
digitalWrite(LED_BUILTIN, light);
digitalWrite(LED, light);
Serial.println(bendSensorValue);
}
// end
•
All Finger Bends are a bit different in terms of the data they are generating, so you may have to calibrate yours.
To do this, after you uploaded your code to your microcontroller, open the Serial Monitor in Arduino and compare the numbers between the highest and lowest… basically when you finger is straight versus bent.
Replace these numbers in the map function from 740, 840 to your numbers.
Keep playing with them until you get the result desired.
the code is also on github
⚡️
•
Bend your finger and watch the light change.
You can use it for lights, visual art animations, motors, sound, and whatever else you desire to control with your finger(s).
You can also find this tutorial on eTextile Swatch Exchange and instructables.
•
Photos documenting process of making 20 Finger Bend swatches :) for the eTextiles Swatch Exchange 2020 Book !


•
All images and videos by WILLPOWER STUDIOS unless otherwise mentioned.